Saturday, November 29, 2008

Confection Perfection? I think not.

My friend Terri Rainer, Published Author, sometimes likes to compare me to Martha Stewart. I laughed quite hard the first time I heard the comparison, because seriously, would Martha Stewart let her daughter sit on the kitchen island to frost sugar cookies?

Would her counter look like this?

Would she produce a sugar cookie gingerbread man who looked like this?

Would she be able to think "outside the box" and make a Halloween Christmas cookie, instead?

Or have compassion for the handicapped?

I think not.

Kendall and I made sugar cookies today from my mom's recipe, which I'm not going to put here, because it's pretty basic, and everyone likes their favorite kind anyway. However, I will share with you this wonderful recipe for Holiday Sugar Cookie Icing from my niece, Nicki, because it's different, and we liked it a lot. It's delicious, of course, but also beautifully shiny, if a little less-shiny when dry. [For the record, we quadrupled the recipe and had only enough for three dozen cookies (counting the 10 that we ate).

Holiday Sugar Cookie Icing
1 cup confectioner's sugar
2 tsp milk
2 tsp light corn syrup
1/4 tsp almond extract
assorted food coloring (we used neon!)

In a small bowl, stir sugar and milk until smooth (it will be kind of stiff; use a knife or metal spoon). Beat in corn syrup and almond extract until icing is smooth and glossy. (This is not for weaklings; you'll need to put some muscle into it :) Divide into separate bowls and add food colorings to each to desired intensity. Spread frosting with a knife or brush. The icing hardens fairly quickly (don't make it ahead of time) into a smooth, high-gloss finish (it creates a "Martha Stewart" sort of finish.)

I did not add that Martha Stewart part to the directions (I swear), but it's true. They look almost professional, no matter how sloppy you are (the shiny takes away from the sloppy.) Here are some of the results. See if you don't agree:

This one reminded me of a Teletubby, for some reason:

Here's a motley crew...

I have to admit, Martha might admire these three, which we noticed at the end were all color coordinated...So you see, I am not the Martha Stewart of the kitchen (and if there's still some doubt, read this) but we have a pretty good time around here anyway. Truth be told, I don't mind the "Martha Stewart of the Blogging World" title Terri gave me....

I just went to see if Martha Stewart has a blog, and she does, and it's nice. I was sucked in right away, dang it! Anyway, as I was saying, I might not be Martha Stewart in the kitchen, but I'm willing to give her a run for her money in the blog department. And I can make a pretty nice cookbook, too. If you liked this recipe, there are many more in my family's cookbook: Hungry for More...A Second Helping of Draeger Descendant Favorites...with a dash of Family History.

Friday, November 28, 2008

Anthea's Autumn Cake

FYI, the closest I've ever come to a famous person is finding this recipe (from a friend of Maureen McCormick a.k.a. Marcia Brady) on the Internet. That said, this cake is famously delicious at my house and any place I take it! Plus, it is the easiest cake in the world to make.

First, gather your ingredients:

1 large (29 oz) can of pumpkin
1 tsp ground cinnamon
1 tsp ground ginger
1 cup brown sugar
1/2 tsp ground cloves
6 eggs
1 cup milk
1 tsp salt
1 box yellow cake mix
1/2 cup melted butter

Whipped Cream or Vanilla Ice Cream

Whenever possible, I like to use a mortar and pestle to grind my spices. It awakens the flavors (and helps get rid of pent-up energy!)


Preheat your oven to 350 degrees and grease your 9 x 13 pan.

In a large bowl, combine the pumpkin, brown sugar, spices, slightly-beaten eggs, milk, and salt and stir.

In case you don't know what "slightly beaten" means, and you're a stickler for following directions (and, as a teacher, I say, "God bless you, Child."), it means that you've broken the yoke and stirred it a little; stick a fork in each yolk....And just lift them up until the eggs fall back into the bowl.


Pour batter into the pan. If you forgot to add the salt, pour the batter back into the bowl, stir it in, then dump it back again, making sure to wipe up your mess ;)

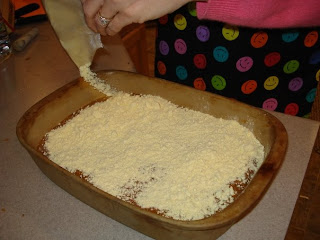
Sprinkle the yellow cake mix on top.


[Yes, my pan looks "dirty," but it's actually called "seasoned," (kind of like my house right now.)]

Take a fork and gently run it through the batter to partially mix the two; don't overdo it, but you should see some of the pumpkin peeking through.


(Be sure to wear your daughter's Home Ec project while you cook, as it adds to the flavor.)

Melt the butter. Pour the melted butter over the top,

and place it in the oven to bake for about 1 hour and 15 minutes. (Make sure that you watch the time when you are preparing this for Thanksgiving meal and want it to be still-warm when you get there. Don't start it late, as that will make you about 20 minutes late for dinner. I'm just sayin'.)

Allow to cool, and top with whipped cream.

Yes, I'm aware that this is a tiny piece, but it was my third one today (Friday after Thanksgiving). Hey, someone has to get rid of these leftovers; I'm just doing my part!


For a printer-friendly version of this recipe, click here.

Thursday, November 27, 2008

Berry Mallow Yam Bake

[originally posted at Half-Past Kissin' Time on December 20, 2007]

Here is my holiday recipe offering. Highly recommended for your Christmas table; beautiful and delicious!!) Mr. 4444 didn't like yams, and I couldn't stand cranberries, but together, they are wonderful, and we both love this dish. No holiday meal is without it, especially if the kids have anything to say about it.

Berry Mallow Yam Bake
½ C flour
½ C firmly packed brown sugar
½ C dry oatmeal (the long-cooking kind, NOT instant)
½ tsp cinnamon
1/3 C butter or margarine
2 C fresh or frozen cranberries
2 Tbls. sugar
1 can (17oz) cut-up yams, liquid drained and reserved
Mini marshmallows ("optional" only for the foolish; it's the best part!)

In a small bowl, combine flour, brown sugar, oatmeal and cinnamon. Cut in butter as for pastry; blend until crumbly. Set aside.

Sprinkle cranberries with sugar (package also says to rinse them in cold water first). 
In 2 qt casserole, layer half the yams, half the cranberry mixture


and half the crumb mixture. Repeat layers, ending with crumbs. 
Pour the reserved yam liquid over all 
(if you double or triple the recipe, don't use it all, or it will be too wet).


Bake at 350 for 35 minutes, or until heated through. 
If desired, place mini marshmallow over the top
and return to oven just until marshmallows are puffed and lightly browned.

NOTE: This is SOOO good, we double the recipe, as there would otherwise be no leftovers (and the kids love them) Put in a large casserole dish or cake pan. Then it’s just right for 4 adults and 2-4 kids. It not only tastes good, but it looks very pretty.

Note: we can never find the cranberries any other time of year than Thanksgiving, so stock your freezer if you hope to make them again before the next year!!!!

For a printer-friendly version of this recipe, click here.

Summer's Harvest Breakfast

[orginally posted on July 1, 2008, at Half-Past Kissin' Time]

Welcome, SITS folks! (Pull up a chair; there's room for everyone! :) Looks yummy, doesn't it? Read on if you love fresh fruit and a healthy breakfast... (and sorry to you anal folks out there who are really bothered by that spoon not being straight. Just keep reading, and you'll forget about it.)

One of the things I love about summer (and no school) is that I have time to make breakfast for the kids (if I feel like it, haha). When I made this favorite for Kyle and me recently, I decided to share it with you. In classic Pioneer-Woman style, I took a photo of the ingredients. (That's where she and I part, though; this recipe is so simple, there is no need to lead you by the hand through every single step.)
The beauty of this "recipe" is that you can use whatever fruit you have available, and since summer has so many fruits to offer (think blueberries, mangos, necterines, grapes, etc.) the sky's the limit! For this batch, I used about 1 cup each of the oatmeal and the yogurt. This yogurt is vanilla, but I've used strawberry before, and it was great, too. If you can't tell, those are sliced almonds (Kyle and I like their nice crunch, but I keep them out for Kendall.)

Start by washing the fruit. I am grossed out by the thought of eating fruit that's been grabbed by Lord knows how many dirty hands. And at the risk of sounding like an infomercial, I'm going to add that I LOVE this product for washing fruit:

It's 100% natural, smells like citrus and gets the waxy coating off of fruits and vegetables beautifully. The store I first found it at doesn't sell it anymore, so I buy it on line. For $20, I bought a 32-oz bottle of concentrated product that makes EIGHT bottles like this (16oz) one, so I'm sure it will last me a at least a few years.

Next, cut the fruit into small (cube-sized) pieces. I have to share my all-time favorite Pampered Chef product, too, because I love it for taking strawberry tops off and digging the top out of tomatoes. (It's also a gem for scooping out bad spots of any fruit or vegetable.) I call it a "doohickey," and I own two, because one is always dirty.
Put the fruit in a medium-large bowl and top with the oatmeal, yogurt, and almonds. Then, just stir it up and eat it! This batch made two large bowls full for Kyle and me.

For more delicious recipes every day, check out the Saucy Eats sister page for SITS! And if you live in a cold climate (or your husband just sets the air conditioner way too high), check out this mouthwatering, hot sidedish we make at Christmas time (but also any time we feel like it!) Now, I'm off to SITS to decide what to make for supper!

P.S. For my also delicious Spiced Salmon with Lime-Orange Salsa recipe, click here. I got it from my friendly neighborhood butcher, who got it from Morey's Seafood International restaurant. It is to die for!

Saturday, November 15, 2008

Best-Ever Pasties


If you're not from around here, you may not know what pasties are, but if you are, you know they are delicious, meat and potato filled "pies" of sorts, a traditional meal from the mining days up in Michigan's Upper Peninsula. Yoopers are weaned on pasties, I'm guessing.

First of all, here's what you'll need. I used the whole can of Crisco, and a little more than one of the bags of flour (you need extra for keeping the counter and rolling pin from sticking). Looks like I forgot to put the butter in the shot above; you'll need about a stick and a half.

This recipe makes 28 pasties and takes 5 1/2 hours from Start to the last one coming out of the oven. We have a double oven (3 racks total), so add time if you only have two racks.) In addition to the following ingredients, be sure you have stocked up on aluminum foil and Ziplock freezer bags. (oh, and ketchup to eat them with!)

Dough:
18 cups flour
6 cups heart attack waiting to happen Crisco
6 tsps salt
4-4.5 cups cold water

Put the Crisco in a large bowl and add the flour and salt. "Cut" flour into the Crisco with two knives, the old-fashioned way, until the mixture is crumbly (pea-sized crumbs).Add water gradually, (and no, that's not really beer.)
and mix with your hands until soft, but not sticky dough.
Don't be afraid to use your belly to stabilize the bowl; at least it's good for something!

Chill dough while preparing filling:

5 lbs boneless chuck roast (I had almost six this time. Don't you hate it when they put more than even pounds in a package?!)
1 lb pork (I used twice this amount this time.)

Cube the meat.
Don't forget to stop and admire the marbling in the beef :)


2 large onions, chopped small


1 1/2 rutabagas, diced small (Not sure what a rutabaga is? They're ugly, and their hard, which is why Mr.4444 takes that job, too.


11 Idaho potatoes, diced small (a little smaller than this)

2 tbls. salt, plus a "little" more
fresh ground pepper to cover, plus regular pepper over that (taste a potato to check amount)

Mr.4444 is manly, so he helps me mix the filling by hand, in an enormous pot (we use that because it's the only thing big enough)


Finally, you're ready to get cooking! Take a burger-sized piece of dough,

 
and gently roll it out to a 8-10 inch circle (not too thin!) DO NOT FLIP OR PATCH DOUGH!

Place about 3/4 cup filling on one half of dough circle. Add a pat of butter to the top. Dip fingers in cold water and wet around edges of the circle.


Fold over to a half-circle, and pat edges to seal.


Trim excess (discard or save for meat pie later.)


Fold and flute edges closed. Cut 1" slit in top.


Place pasty on pan, tipped in the direction of the fold, so that juices flow inward, not out. (Key: No holes in dough!!)

And, yes, that is a Pampered Chef baking stone. It's not dirty, either; it's just beautifully seasoned.

Bake at 350 degrees for one hour (extra 5-10 minutes if using a stone). Obviously, with 22 pasties, fitting 3-4 to a cookie sheet, you will be baking all day; just bake as you go. After they come out of the oven, put on cooling rack and spoon 1 T water inside each pasty through the hole on the top. Cover with a damp towel for 10-15 minutes. Remove towel and let cool.

Wrap in foil and place in Ziplock bag. Pasties freeze very well and can be heated up from the frozen state without a problem.

Finally, you must eat a pasty the proper way (with ketchup) to truly get the full effect. Enjoy!