Showing posts with label dessert. Show all posts

Monday, February 3, 2014

Banana Almond Chocolate Chip "Ice Cream"

I have a new, favorite treat.
It tastes surprizingly like ice cream, but it's much less guilt-producing!
Who knew that sliced, frozen bananas, when blended, tasted like ice cream?!
My friend Colleen's son did; that's who! (Thanks for sharing, Colleen!)


This is an excellent way to use up bananas you can't otherwise find a use for.
I have a freezer full of frozen bananas I've never gotten around to using.
Not anymore, though!
I mix the following in my Nutribullet, but I'm sure a blender would work, too.

1 sliced banana, frozen
1 tablespoon almond butter
1 1/2 teaspoons flaxseed
1 cup unsweetened vanilla almond milk
1 1/2 teaspoons of chocolate chips

Blend it all up and enjoy with a spoon or straw. Delicious!!

In addition to the nutritional information below (which I gleaned from My Fitness Pal), add 78 calories for the chocolate chips.

The same amount of ice cream would be at least 450 calories 
and contain 75% of the recommended daily allowance for fat calories.

Sunday, March 31, 2013

Mini Key Lime Cheesecakes

I found this recipe via this pin on Pinterest. That pinner got it from here, and it's important to note, because the two recipes vary in that one calls for beaten egg yolks, and the other calls for beaten egg whites. (I chose whites, since I figured they're healthier than yolks, and we all know this recipe is otherwise healthy, right?haha)

 Ingredients:


Since Mr.4444 cannot come home from the store with just one of what I ask for, I decided to double the recipe! Here follows the list of ingredients for a single batch:

1 1/2 cups crushed graham crackers (about 18 squares)
3/4 cups lime juice (Key Lime is preferred, but I don't know the difference, and it doesn't matter)
1/2 cup butter (originals called for 3/4 cup, but that was wayyyy too much, as you will see later)
3 egg whites, beaten
2 cans sweetened condensed milk
1/3 cup plain Greek yogurt
3 Tbls. sugar
1 Tbls. lime zest

By the way, you should be able to get 3/4 cups of lime juice out of 4 or 5 limes.

First, crush the graham crackers inside a baggy, like so:


Then add the melted butter. Use your judgement about how much to use; the recipe called for 3/4 cup, but it turned out to be way to much butter, as you'll see in a moment.

Put a couple of tablespoonsful of the crust mixture in cupcake liners and press them down with the bottom of a small drinking glass or measuring cup.


Bake for 8 minutes at 350 degrees and allow to cool while you prepare the rest.

While the crusts are baking wash your limes if you're fresh-squeezing them. Don't think that's necessary? Consider where the produce boy's hands have been, not to mention the customers who touched those limes before you did. (Yeah, I thought so!  You'll never not wash your produce again, will you?! You're welcome.)


Before squeezing lemons or limes, I always poke them with a fork and then microwave them for about 30-45 seconds to warm them up a little, which gets them to let their juice go easier.

Now, here's where I'm going to help you avoid making the same mistake I did--You are going to need lime zest, and I forgot that it's a lot easier to zest a lime before you squeeze it than after, so zest your limes before you nuke them, or you'll end up doing this (trying to hold the lime's shape while pressing it against the grater. (Note to self: Buy a lime/lemon zester.)


I'm told you can buy already-squeezed lime juice, but where would the fun be in that?!


By the way, for some reason, it took this many limes for me to get a tablespoon of zest: 


(Maybe I wasn't trying hard enough (I was a little worried about grating the skin off of my knuckles...) 

If you buy lime juice, you're not going to have zest, so keep that in mind. I'm sure it's not absolutely necessary, but it does add a little bit of color and texture. My subsequent lime-zest research revealed that you should be able to get a tablespoon of zest from two limes. (Go figure!)

Now prepare the cheesecake batter. I was confused about the "beaten egg whites," as the only time I've beaten egg whites was when they had to be beaten into a meringue, so I started to beat them in my Kitchenaid mixer, and by the time they were at a froth, I'd changed my mind and stopped. As a result, I ended up with enough for two pans of mini-cheesecakes and a pie! Next time, I will probably just beat the egg whites a little and see what happens.

Add the sweetened condensed milk, sugar, yogurt, and lime juice and zest to the egg whites.


Stir well and pour into the muffin tins. The recipe said to make them 3/4 full, but I had way too much batter to hold off, so here's what I did. (This is where you'll note evidence of how I know there was too much butter in the crust mixture.).


Bake 15 minutes. They're done when you can stick a knife in and pull it out without much on it. They shouldn't be brown or be cracked.


After they've cooled, serve with whipped cream and lime garnish (if you want to; I just used a little piece for the photo and had sent Mr.4444 to the store for the whipped cream, so it's not in this shot, but you get the idea.)


 I will definitely be making these again, as they have just the right amount of lime in them, 
and everyone here (and at work) loved them.

Saturday, July 2, 2011

Devil's Sex Cake Bites!


Tonight I started making one of Kyle's favorites--Devil's Sex Cake when I had a fantastic idea! 
OMG!! I could make Devil's Sex Cake Pops or Cake Bites! What fun! Here's how it worked--

Make Basic Cake Pops using devil's food cake and milk chocolate frosting. 
You'll also need this (4-6 bars if you're making a whole cake, or just two if you're making cake pops out of half of the cake, which is what I did)


and this...


I think Mrs. Richardson's might not be available in everyone's area, 
so if you find some, buy more than one (for next time)!

You'll need some CoolWhip if you want to go that route (you'll see what I mean later).


After chilling the dough and making the balls, poke the end of a wooden spoon into each cake pop, 
making space for the best part (coming up in a minute).  I want to point out that after I made the holes,

I realized this would stick less and might work better:


(It did.) Recognize it? It's a nutcracker! (Necessity is the mother of invention, you know.)

Okay, back to the yum!  Warm up the Mrs.Richardson's and put it in a pastry bottle (or whatever it's called--I got it at a cake supply store a while back). BE CAREFUL!  I heated mine in the bottle (not the most efficient method, but it is what it is), and when I took it out of the microwave, it SQUIRTED sauce all over the cupboard and burned my hand a little (after only 15 seconds!)

Anyway, squirt a little deliciousness into each cake bite....


And then patch each one with a little more dough.
You can then just gently roll them again to regain their round shapes. Chill again.


Crush the Heath bars and set aside.


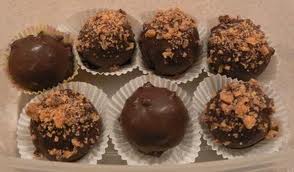
 When the cake balls/bites are chilled again, dip them in melted candy coating
and sprinkle with the Heath candy before they cool/dry. 
I did some like that, and I then tried just stirring the Heath bits into the melted coating
and dipping the cake balls into that. It worked "okay," but not great.

And I also did some like this!


They're beautiful like this, but they have to be eaten right away, and believe me, they were--
I wish I had a video of Kyle's face when he at the first one--That does a mom's heart good :)

So, I made them three different ways, and to tell you the truth, all were delicious!


Yum!


Friday, May 13, 2011

Cake Pop Kids

I first got into the cake pop thing after landing on Bakerella's blog and buying her book for Kendall. Kendall was too busy with school--classes, prom, final exams, getting her driver's license, etc. to barely open it, but I figured it could be a fun little hobby for her.  She loved the cake pops I made, and when she finally wrapped up her A.P.European History exam, she decided it was time to play!  She made her first batch on Wednesday, and they were so wildly received at school that she and her friend, Kelsey, excitedly made some more, this time for A.P. classmates.


That little bottle in her hand is worth its weight in gold, btw!


A little messy (she's learning). 
I suggested she decorate before putting them in the cute little paper cups,
 but what do I know?! :)


You know you've been making cake pops when...


Cake pops, cake balls, goof balls...It's all good!

Thursday, May 5, 2011

Baby Shower Cake Pops

In case you haven't noticed, I've got a new hobby--making cake pops. 
Inspired by Bakerella's book, Cake Pops, I've been having a lot of fun! 
Recently, I googled "Baby Shower Cake Pops" and found a super-cute baby cake pop photo 
(which I can no longer find, of course). 
My colleague, Tina, is about to "pop," so what better treat to bring to her baby shower 
at school tomorrow!  I had so much fun making these!


I used Bakerella's Basic Cake Pops recipe and used the following ingredients to finish my them off:

Dark Chocolate Cake
Milk Chocolate Frosting
Wilton white/vanilla candy melts
Dark Chocolate Candy Coating purchased at my local cake decorating store
a black "candy marker"
cupcake liners
tiny fabric ribbon
a Styrofoam base on which to display the cake pops
cotton candy for the "bed" of my display

Obviously, I went with white candy melts for some of these. I have to admit; they're not my favorite, 
but I didn't know where to find "white" chocolate on short notice. 
I also used dark chocolate candy coating, because that's my favorite, 
and I love the results...soooo cute! 
(It's hard to see in the photos, but they are adorable in normal lighting.

Sadly, I had one "crack baby."


And this one is the first one I made (and my favorite)...


It was a messy job at times, but the process was fun and not hard at all (just lots of steps).


How could it not be fun, with these little cuties staring at you all night?


For what it's worth, they are easy to make; it's just time-consuming. You can easily make the dough and roll the pops ahead of time.  You can also keep them in the fridge (air-tight container or foil covered) for days;
I've eaten week-old pops that are still fantastic.

So, don't you wish you were pregnant?
(Me neither.)
But I'm pretty sure Tina's gonna be glad she is!

Note: Making these took me five hours (I told you it's a hobby!) If I make them again, it will probably go a little quicker.  If I were to sell these cake pops, I wouldn't make them for less than $100, considering the labor and materials. (That's about $2.40 each.) So, yeah; it's not something I'd do every day, but I'm really glad I made them, because I know they'll be a hit tomorrow at the shower!

Thursday, April 28, 2011

Cake Pop Fragments

So much to say about cake pops that I decided to put them here, rather than at Half-Past Kissin' Time.

Difference Makers and I made a bunch of cake pops tonight.

I made some Easter Egg Cake Pops/Bites over the weekend. Visit this post for pics.

My sister Judy made the cutest cake pops for Easter. Aren't they adorable?!


She also made some amazing graduation cake pops, just for fun...


Incredible, no?

For my next trick, I will make baby boy cake pops for a baby shower. 
You will love them.

I've gotten such a kick out of turning so many people on to Bakerella's book. 
It's a joy to have inspired people to have so much fun. 
  I look forward to seeing more of your creations in the coming months. 
 Thanks, Bakerella!

Thursday, April 21, 2011

Bakerella's Cake Pops

These cake pops are so popular, I so far keep forgetting to get photos of them before they are all gone! I'll keep working on that. For now, please accept this shot, taken by Angie Dudley, a.k.a. Bakerella.


I learned about Cake Pops/Cake Bites/Cake Balls a couple of weeks ago and have made three batches already. I'm serious about how good they are---EVERYone absolutely loves them. I bought Bakerella's book, Cake Pops for Kendall's birthday party, and I had to try them out. Although I am putting the recipe basics here, I highly recommend the book; it is very detailed (yet user-friendly) and filled with inspiration. You can find it everywhere, but I bought mine at Target for about $15.

Basic Recipe:
A boxed cake (and accompanying ingredients--usually 3 eggs, oil, and water) I prefer Dark Chocolate flavored)
1 container of ready-made frosting (I prefer milk chocolate flavored)
almond bark or candy coating (I strongly prefer melts from Creative Cake Supply in Green Bay)

Optional:
sucker sticks (paper is best), for if you want to make cake pops
tiny cupcake paper thingies
sprinkles/candies

Basically, all you have to do....

[Hmm. Should I really make this sound easy? Maybe I should keep that to myself, so I can be admired like I was today at work when I shared these. I kind of like the illusion that I am a fancy, talented chef. Nah--I'm too nice to keep it to myself--You win.]

All you do is bake a cake, cool it, crumble it up (directions for novices, like me, are in the book). Add 2/3 can of frosting, and mix it together using the back of a spoon or spatula. Chill. (The dough, silly.)

After several hours in the fridge (or 15 minutes in the freezer, apparently), take some of the dough out (keep the rest cold) and roll it into little balls with your hands, washing (and drying) your hands every so often (when they get too sticky). Treat it like Play-doh, and make sure there are no cracks.  Place the balls on wax or parchment paper on a cookie sheet. Put the balls in the fridge while you roll the rest of the dough.

Put the candy coating disks in a microwave-safe bowl and melt them. Bakerella recommends 30 seconds at 50% power, stirring and repeating until melted. Drop the balls, one at a time, into the candy coating (or put them on sticks and dip them). Use a teaspoon to lift the ball out, tap the excess coating off and carefully place on a cookie sheet.  This is the part that takes a little finesse; be prepared to eat a few mistakes!

THIS IS IMPORTANT: The coating dries quickly--If you're going to sprinkle stuff on it, now's the time to do it! If you're going to get all fancy like the book and make adorable faces, etc. on the cake balls, you'll have to follow the directions in the book.

After the cake pops are dry (5-10 minutes), you can put them in decorative little cupcake papers or stand the pops up on a styrofoam block. They also make cute display boxes for them. I keep my cake pops cold, but that's just my preference.  The cake pops last a long time in the fridge. For example, tonight (Thursday), I ate some from Kendall's party last Saturday, and they were still excellent! (cover with plastic wrap or keep in an air-tight container.

Oh, and if you don't have decorative sprinkles, you can just drizzle melted candy coating across the cooled pops--It looks very pretty.

For the record, Walmart has a wonderful selection of cake baking paraphernalia, but I just do not get the same results from their melts; I would rather go without than use theirs.

I have so far made these with:
*dark chocolate cake with milk chocolate frosting, coated with dark chocolate melts (my favorite)
*yellow cake with vanilla frosting, dipped in chocolate (wonderful)
*strawberry cake with vanilla frosting, dipped in white chocolate (not candy coating). These were sickeningly sweet. Next time, I'll avoid white chocolate and stick to white candy coating, maybe.

I've also made these labors of love for a baby shower.  It's one of my most popular blog posts to date.

So now, I'm thinking of finding a way to sneak some crunchy peanut butter inside the dark chocolate cake pops.

Be still, my heart!

Sunday, December 19, 2010

Nutella Chocolate Chip Cookies


Wow. I've eaten some cookie dough in my day, but the cookie dough I ate tonight may well go down in history as the best I've ever eaten.

I'd never heard of Nutella cookies before reading a post from Jene (at The Original Bean), and I'm very glad I did, because these cookies are delicious! (raw or cooked!)

Ingredients:


1 1/2 sticks of unsalted butter, room temperature (I used salted.)
3/4 cup of brown sugar
3/4 cup of white sugar
1 cup of Nutella
1/2 teaspoon of vanilla
2 eggs
2 cups, plus 2 tablespoons of all-purpose flour
1/4 cup of unsweetened cocoa
1/2 tsp baking soda
1/2 tsp salt
1 cup of chocolate chips
1/2 cup of chopped hazelnuts (I added a whole cup because 1/2 cup didn't look like enough)

As you may have noticed, the recipe called for chocolate chips, of which I had none, so Mr.4444 kindly took out his trusty kitchen knife and wacked up some Bakers chocolate that I had.  Like Jene says, I finally found a use for the other end of my Pampered Chef measuring thingy...


First, cream the butter until its...well....creamy.


Then, add the vanilla, sugars, and Nutella. Mix well.


Add the vanilla and the eggs (one at a time, mixing 30 seconds between each egg).


Put the flour, baking soda, and cocoa....wait a minute! 
What flour?! Dang it--Sorry, I forgot to put the flour in the ingredient photo. Here you go!


The recipe said to sift the dry ingredients, so I did what any resourceful cook would do:


What?! Yes, it's time-consuming and a little annoying, but you can't argue with the results
(or the directions, which remind you that cocoa stays in chunks if you don't sift it):

 
Mix well.

Fold in the chocolate chips and the nuts.
The recipe calls for hazelnuts, but I made an executive decision on that one, too; 
since hazelnut coffee makes me gag, I went with walnuts.

Now here's where I muffed up the recipe and you should not. (Like my mom always said, "Do as I say, not as I do!"  Chill the dough for ten minutes or so. I didn't, and the result was kind of disasterous; so bad that I can't show you a pic (Just kidding--I did take a pic, but I lost it, so you'll have to use your imagination. Picture big, flat cookies all run into each other on the pan.)

If you haven't eaten all the dough yet, put it by rounded spoonsful (I used the big Pampered Chef cookie scoop) onto  parchment paper and bake at 350 for 10-12 minutes, allowing to cool a bit on the pan before transferring to a cooling rack.

While my cookies came out flat as pancakes and badly misshapen, I'm happy to report that they tasted fantastic and got rave reviews from Kendall and Mr.4444. They were all gone within two days.

I can't tell you how many this makes, since eating have the dough skewed my end result. (Jene said that they're too rich to eat too many, but you can see what a liar she is.) If you make them, let me know what you come up with, if you can resist...